Shoulder Carry Sheath

$115.00

Want to easily carry a well tuned and sharp machete with you on your next trekking adventure? How about easily stacking your most important gear to the sheath converting this rig into a stand alone carry system?


The Shoulder Carry Sheath System includes:

  • Our heavy duty seatbelt webbing shoulder strap, stitched and fitted
  • Backpack sheath with ABS hanger and Handle Retention Strap
  • MultiFit Mounting Plate 2.0

Colour options include :Matt Black Epoxy, Coyote Tan and our new Olive Drab

Regular Price $115

Suits:

12″ Tramontina Latin   26620/012  (25mm straps)

14″ Tramontina Bolo    26624/014

18″ Tramontina Latin   26621/018

NB: Some components shown in the photos and examples are optional extras and not included in this package. The machete, HeatShrink Skin Ranger Bands, paracord, Slim Paracord Fids etc can be purchased separately.

Description

NAMCo’s All New SHOULDER CARRY SHEATH

Carrying the right gear with you when you're out in the bush is important. Having it stacked to a Shoulder Carry Sheath means whenever you have this rig over your shoulder, you have all the important equipment with you in one easy to carry system....including your well tuned and darn sharp machete!

We are really excited about our all new Shoulder Carry Sheath. Along with our many earlybird customers, we have been putting this new sheath through the paces. The more we use it, the more we realise we should have set one of these up a long time ago. It is a very user friendly way to carry a sharp machete with you while trekking through the bush. The ability to easily stack your own pouches and gear changes this sheath into a Carry System, and it is a game changer for us.

Want to find out some more benefits and features of this new Shoulder Carry Sheath?

Is it easy to draw and stow the machete?

That is a solid yes from us! We are machete bushcraft enthusiasts. Being able to quickly draw and stow a well tuned and sharp machete needed to be a simple and intuitive process. Of course 'function' was always going to be a fundamental design principle for us. Take a look below (our FAQ's) for a detailed description on how we do this but for an appetiser, here is a short clip showing how easy it is. You see can in this clip that the sheath sits on the non-dominant side (left hand side for right handed use).

What! You can stack important equipment to the sheath?

Out of our whole sheath line up, the one most suited to carrying extra gear stacked to it is this Shoulder Carry system. You can easily mount the extra equipment you're going to need on your next adventure by utilising lots of simple rigging options. Ranger Bands are the most user friendly choice when mounting your gear but the real prize is the additional paracord tunnel in the MultiFit Mounting Plate. By running a dedicated lanyard through this, you can secure important equipment effectively preventing any unintentional gear loss.

Follow the Blaze Orange Paracord in the photos for a better description!

Is the rig easy to carry, pull on and take off?

We have a rule here in our workshop 'If it's set up to be easy, then it's going to get used!' Everything about this Shoulder Carry Sheath fits that design model.

The wide and soft webbing distributes the load comfortably on the shoulder and the angled straps keep the sheath hugging the body while you're on the move. It's as simple as swinging the sheath behind or to the side to find an appropriate carry position. You can easily swing it forward when you need access to your equipment. The straps are height adjustable so you will find a ride hight that suits.

As far as pulling on and dropping the Shoulder Carry Sheath, we made sure this was simple as well. Tangles in bag straps are frustrating. By minimising the hardware and stitching, carefully angling the straps, and keeping the seatbelt webbing in one piece, we ended up with a really easy and intuitive to use Shoulder Carry Sheath system.

Now for all you info hungry campers out there, the rest of this page is for you.

We get to share all the nuts and bolts of this Shoulder Carry Sheath and show off everything that goes into developing a new product....Oh and surprise surprise, we are fans of a beefy FAQ's section as well.

Is it easy to draw and stow the machete?

Did you miss the short 9 sec video? It's fast, easy and convenient to draw and stow a machete but, we decided to add a written description as well. There is a lot going on that needs explaining. We were after an efficient method that would be quick, safe and did not damage the shoulder straps (our machetes are sharp and can easily slice right through seatbelt webbing). After a lot of experimenting, the 'Samurai style' draw and stow was a clear winner. We found it fast and safe.

Lets start out with the machete safely stowed in the sheath and the edge facing to the rear. The best method we have found is as follows:

  • With the non-dominant hand, grasp the sheath about at the half way point and lift it to a horizontal position and push forward slightly. The edge (within the sheath) is now facing up and the hand is under the sheath (on the spine side). The straps will fall clear of the opening of the sheath, preventing them from being cut.

  • The dominant hand comes across and grasps the handle and then draws the machete while pointing the handle directly forward. The smooth spine of the machete runs along the inside of the sheath

  • Once the tip has cleared the sheath, us and the straps, we rotate the wrist which presents the machete in a normal forward facing position.

Stowing the machete is just as easy. We just follow the steps in reverse paying careful attention to the position of the tip. It needs to be safely within the sheath before we guide it home.

What parts make up this shoulder rig?

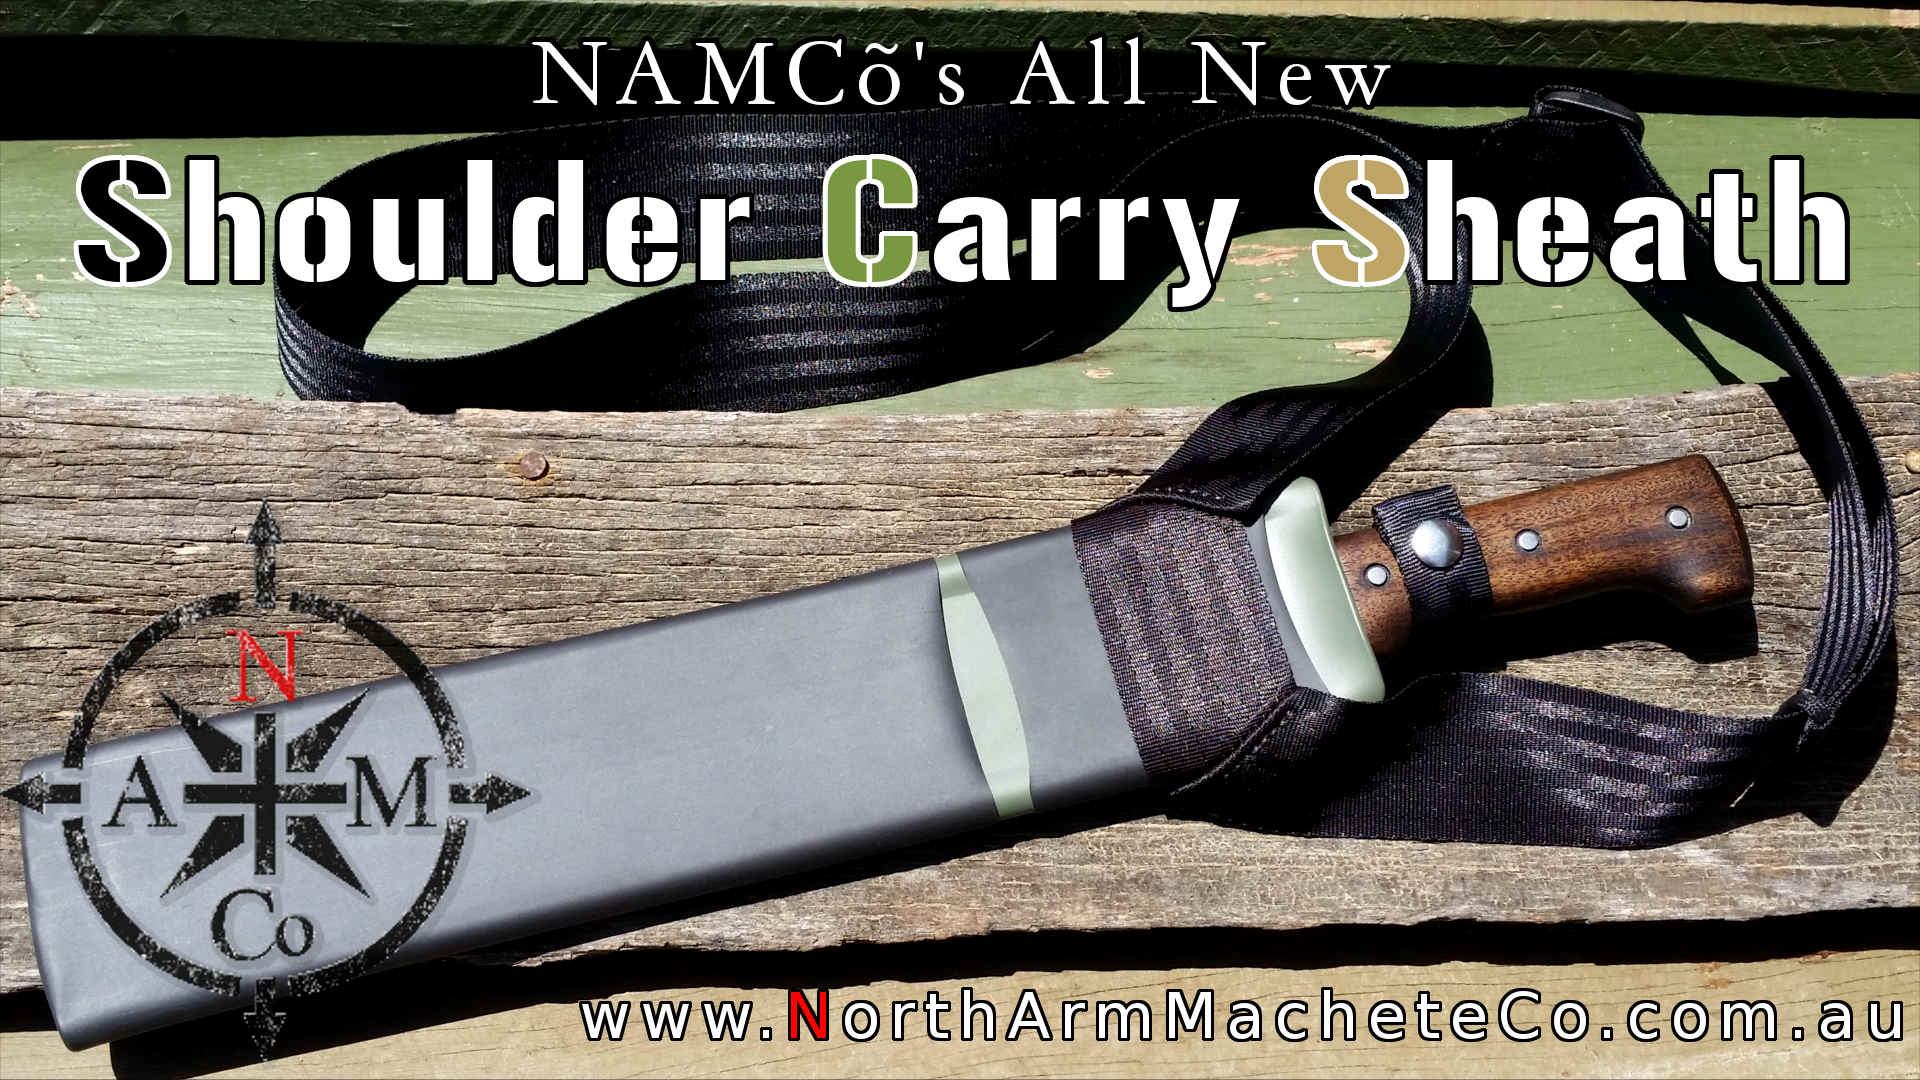
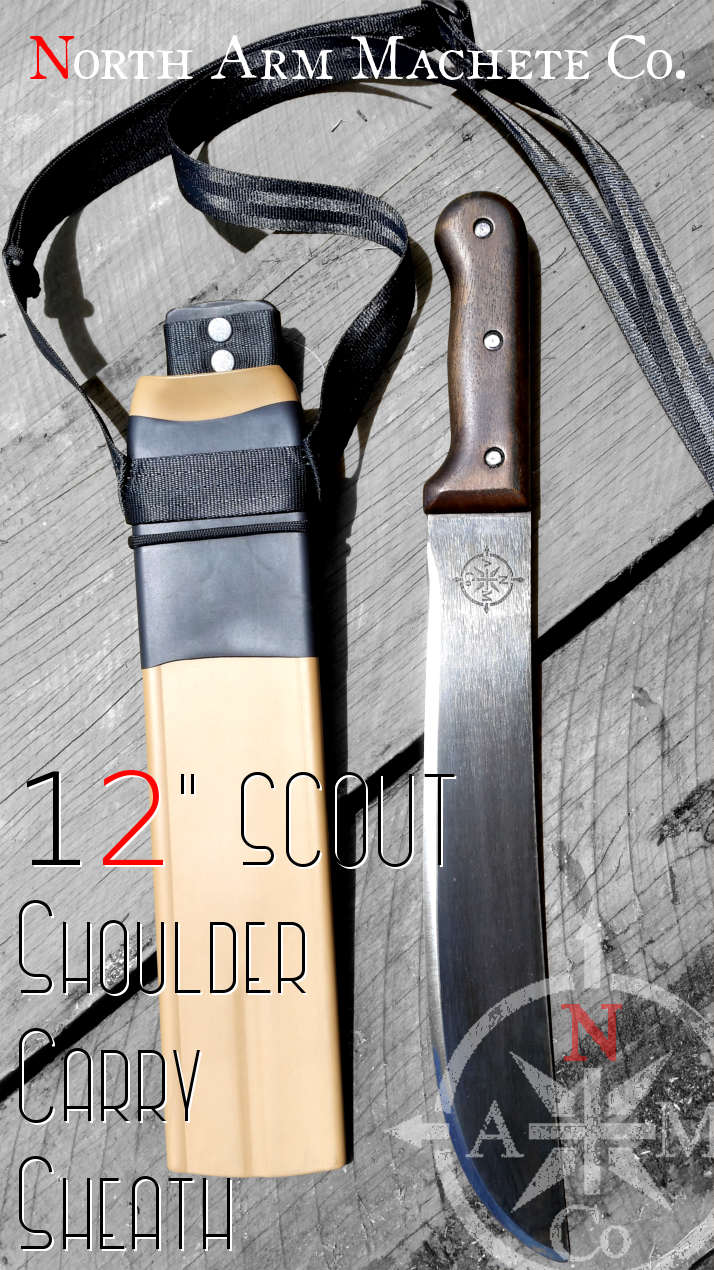
Most of our many machete & sheath mods are interchangeable (Mix & Match style) but essentially it is a trio of components that makes up our new Shoulder Carry Sheath:

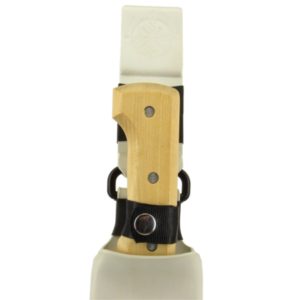
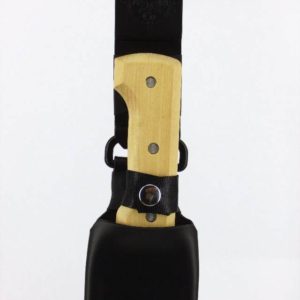
  • Backpack Sheath with the ABS hanger upgrade and a Handle Retention Strap

  • The new MultiFit Mounting Plate 2.0

  • The seatbelt webbing shoulder strap

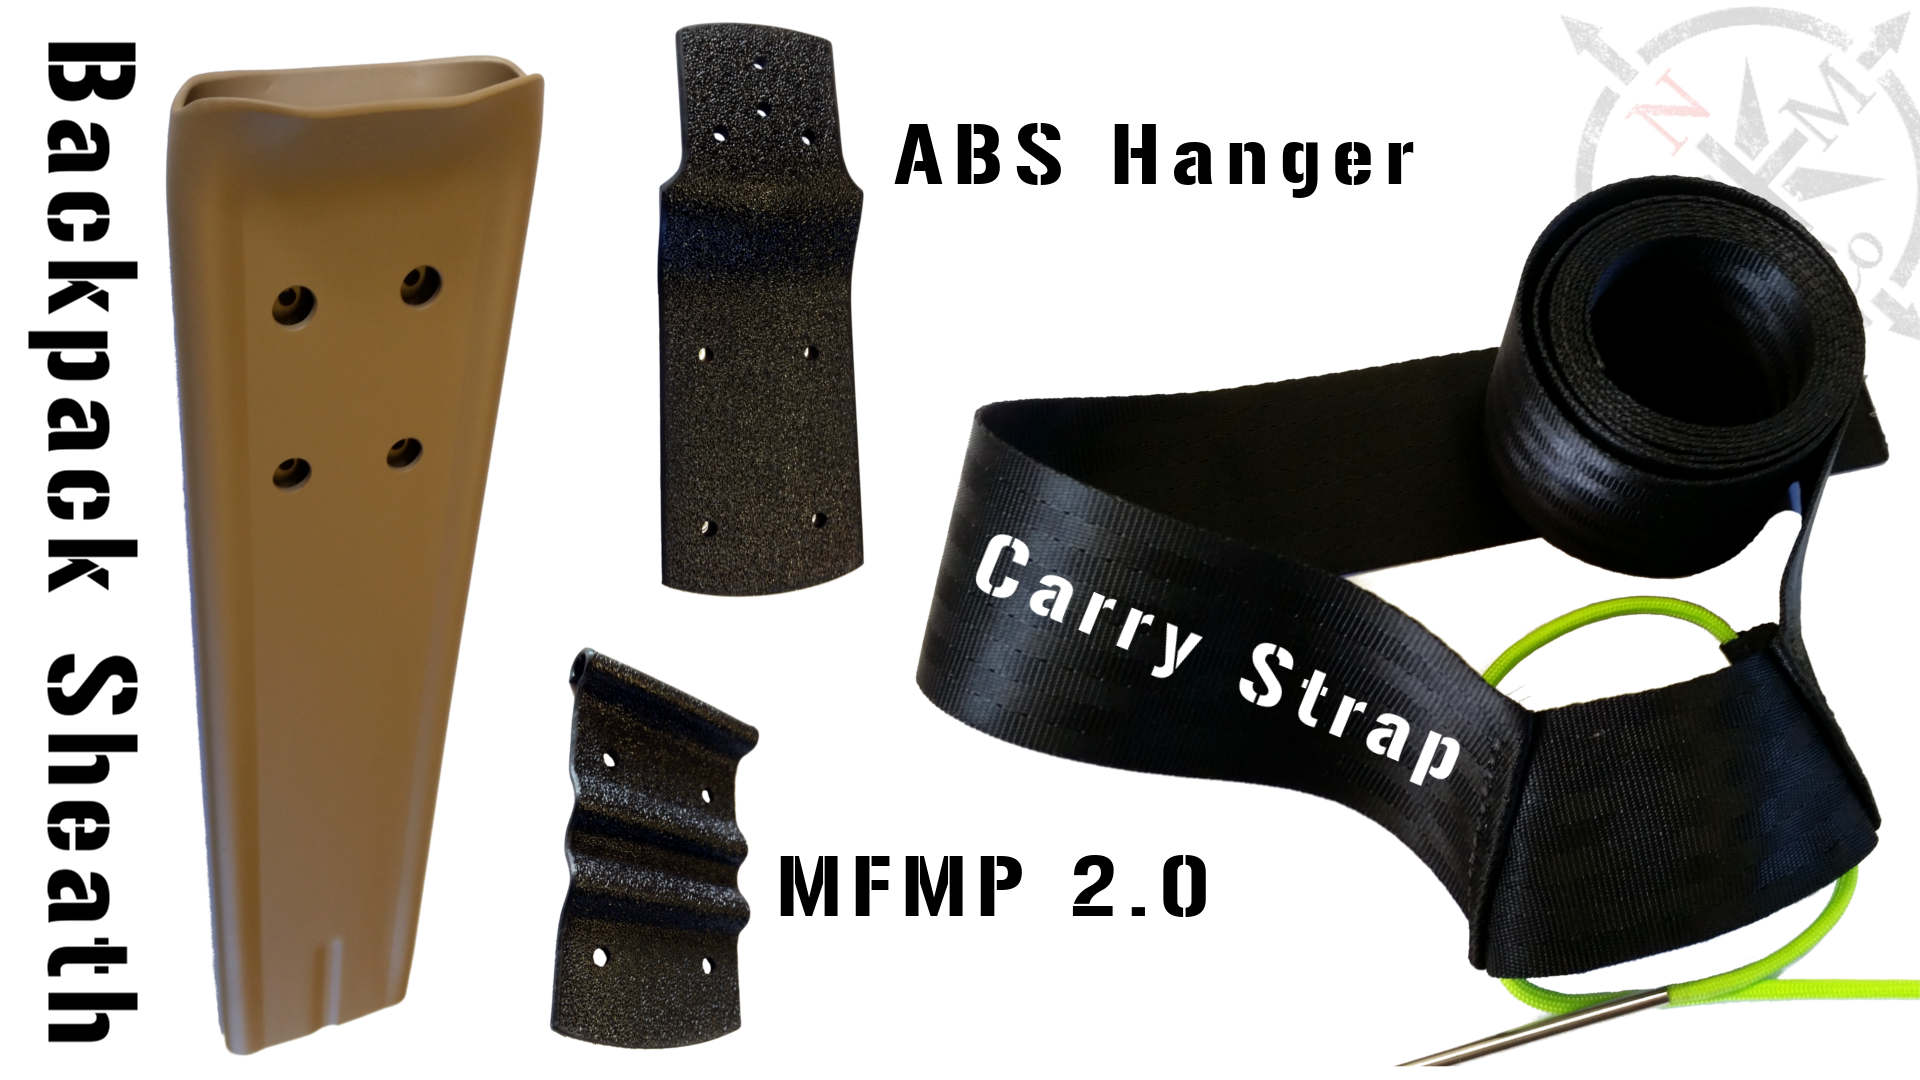
North Arm Machete Co's Shoulder Carry Sheath major components

Why is this Shoulder Carry Sheath better suited to stacking gear to it versus your Belt Hung & Backpack sheath?

First up, stacking gear to a machete sheath is nothing new. You have all this free real estate on something you're carrying around with you and it can be put to good use. This is just our version of it.

The simple answers are:

  • The sheath (and gear stacked to it) sits higher and is is less likely to get hung up on vines and bushes

  • We are already use to carrying our equipment from a shoulder style bag. The Shoulder Carry Sheath with gear stacked to it is just a logical progression. It's essentially a mash up of a sheath and bag in one convenient unit

  • The sheath is very easy to sling behind, to the side or to the front. This gives you easy access to equipment as well as being able to sling it out of the way when needed.

  • The tunnel in the MultiFit Mounting Plate (MFMP) makes it super easy to solidly attach a fixed lanyard. You can secure vital equipment to this lanyard.


What can I stack to my sheath?

This is personal preference and it is going to differ wildly between everyone. Be creative and experiment. In the provided pictures, we stacked a full sized Ontario Ranger canvas sheath in one scenario. In the other picture we attached some paracord, a small knife and a TinderTube. Personally, I like some simple fire making equipment, sharpening gear for the machete, a space blanket and some paracord. Lately, I have also been packing a small hobo fishing reel as I often walk along a small river. There is a limit to what you can pack on this platform but common sense is your best guide....for example, I would recommend avoiding attaching a house brick to your sheath. We tested it, the sheath carried it, and it was not comfortable. You can always contact us if you have any questions. Actually on that note, send us a picture of your rig once you have it set up!


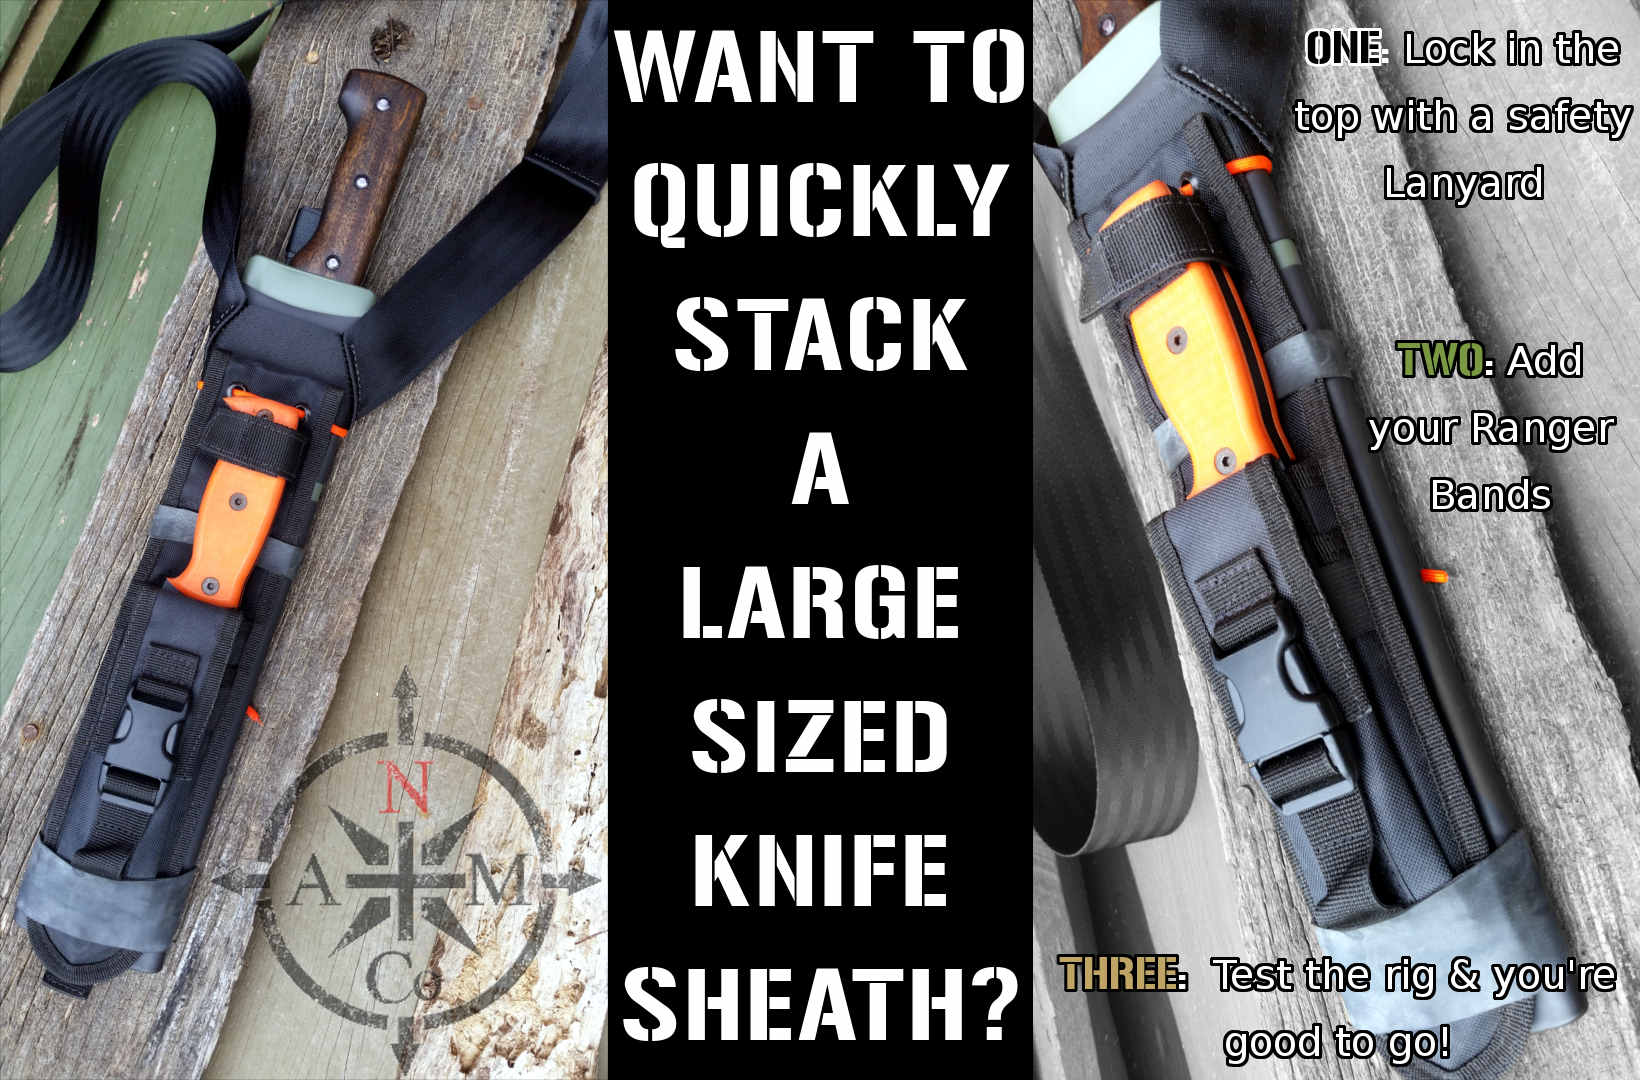
How do I attach gear to my Shoulder Carry Sheath?

This bit is easily done with Ranger Bands (Motorcycle inner tube cut into calamari rings) but, we took it one step further.

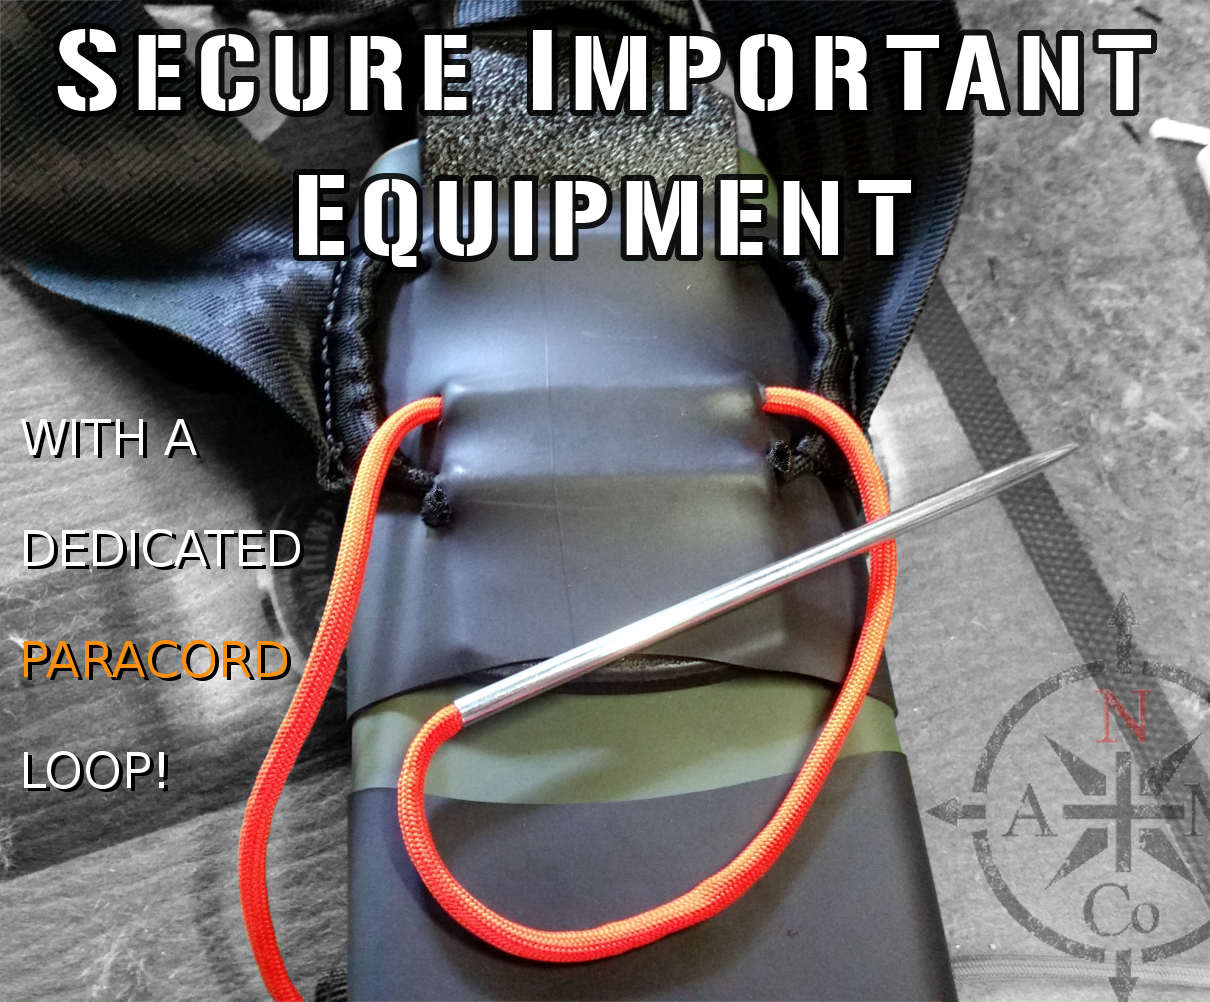
An important feature that we included in this package was the extra paracord tunnel in the MulitFit Mounting Plate (MFMP). The shoulder strap uses the top and bottom tunnel but we kept the middle one there for good reason. You can use it as solid attachment point for a gear lanyard. Nobody wants to loose their gear out in the bush. If you stack your gear to the sheath using this safety lanyard, it's going to be darn hard for it to become separated from your rig.

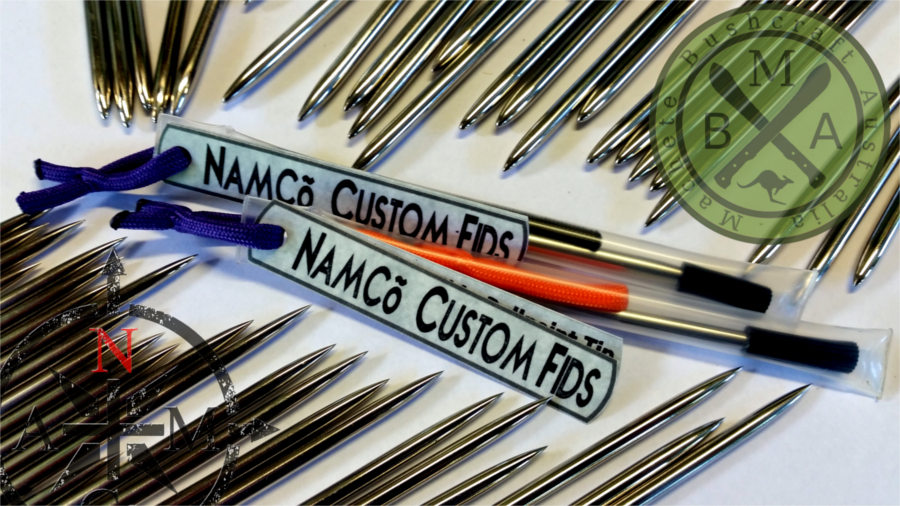
If you're planning on only using a single strand of paracord through the MFMP (like the orange cord in the photo), you can get away with basic tools to feed the cord through. Just poke a hole in the heat shrink with a blunt chopstick to gain access and use a slim bamboo skewer to pass the paracord through the tunnel. If you're planning on doubling up the paracord in the tunnel or are feeling a bit creative, one of our Slim Paracord Fids are essential. The 4mm Universal slim fid would be my recommendation. It has a 'Ballpoint' tip.

The rest of the gear stacking is self explanatory. Cable ties, tape and cord are commonly used but Ranger Bands make short work of keeping your gear cinched to the sheath. You can also get inventive with your paracord lanyard. What about making a locked Daisy Chain Dropper or your own mounting plate from paracord and seatbelt webbing? Take a look at our unique paracord fids page for more ideas. Nobody makes a better paracord fid than us!


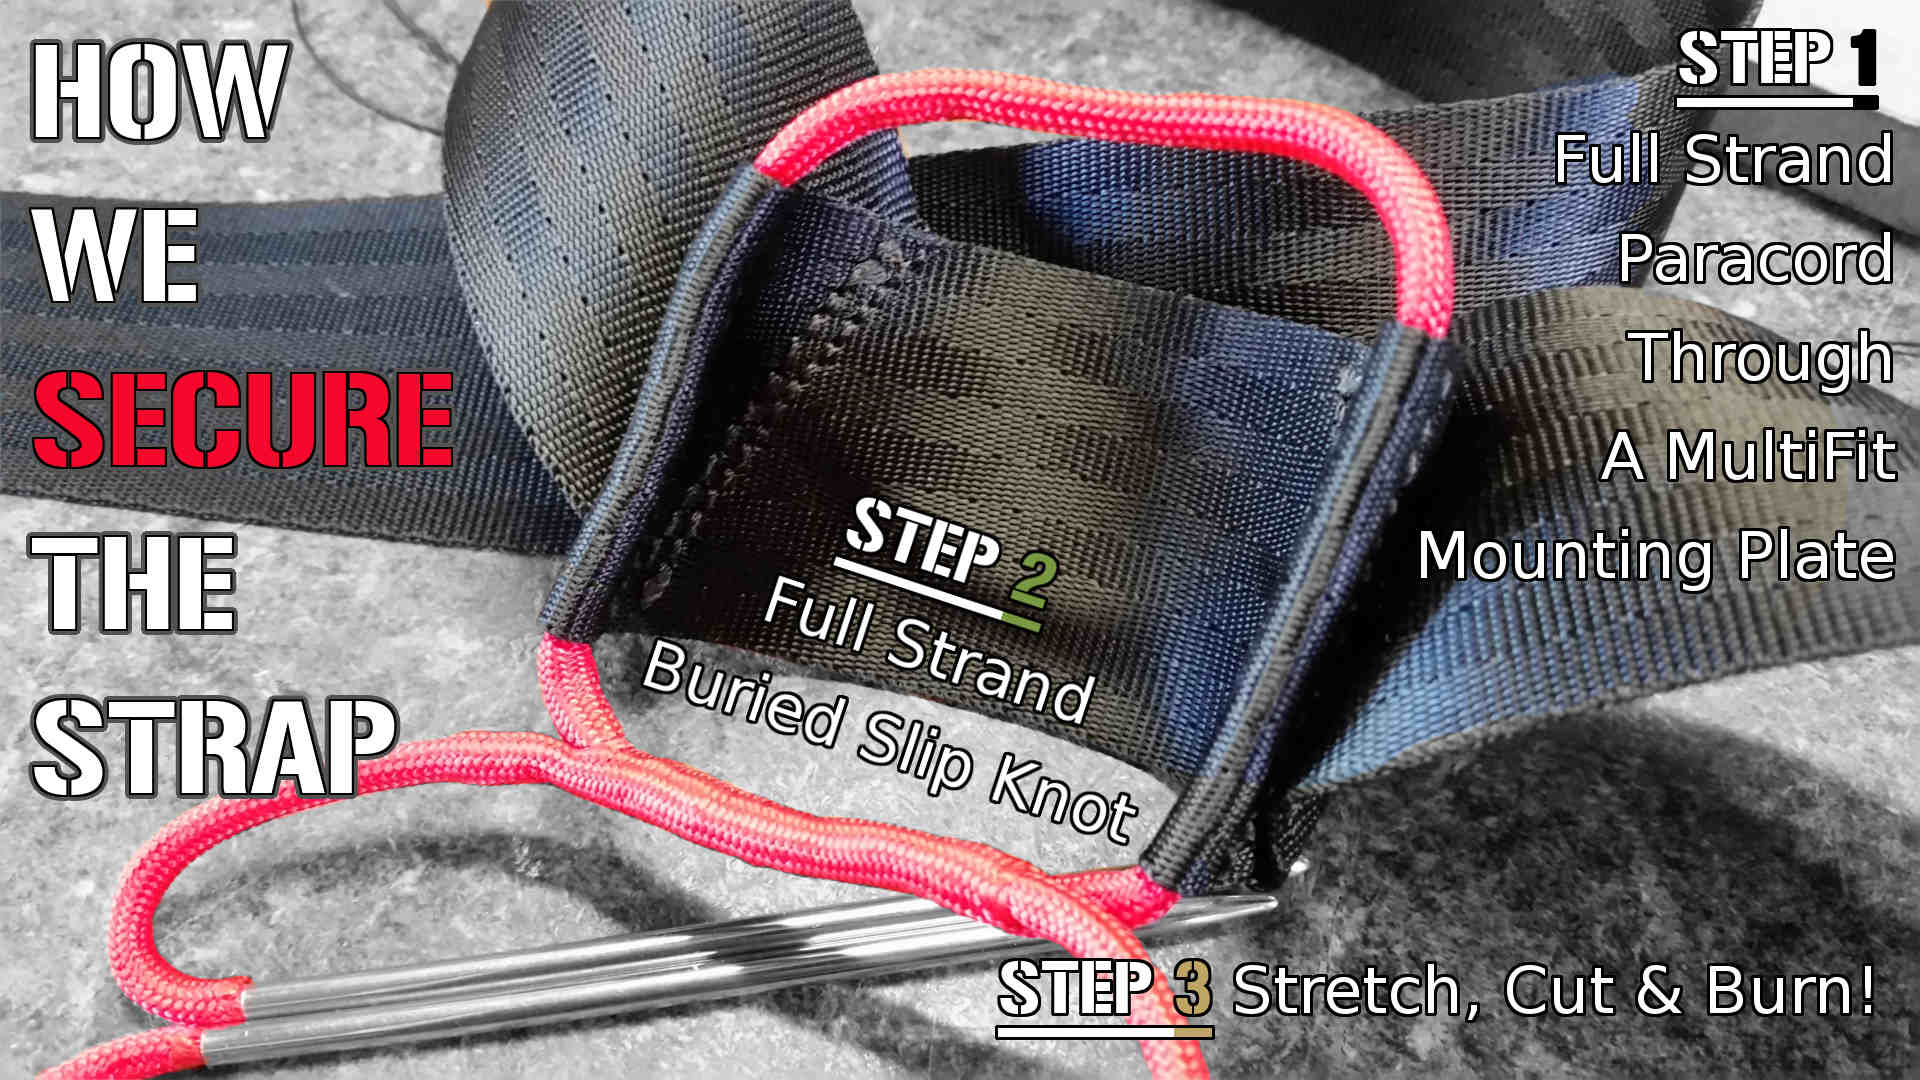
What is holding the shoulder strap to sheath?

Paracord and the MultiFit Mounting Plate (MFMP). There is some redundancy built into the system as well. First up, the paracord is full strand. We don't need to remove the internal strands to do the Buried Slip Knot. The paracord is passed through the dedicated channels stitched into the webbing as well as through the MFMP's top and bottom tunnels. We then do the Buried (pass the paracord down through itself) Slip Knot and seat it inside the bottom tunnel. We then stretch, adjust and tighten everything down. Once we are happy with the placement, we cut the lose ends and then melt them. The buried paracord pulled very tight, cinches down on itself. The burnt ends act as a backup so the loop cannot lose its tension.


Is the strap adjustable?

Yes it is. Most users will find a comfortable ride height within the strap's length. We found a heavy sheath rides comfortable when it's set high. Light sheaths ride nicely low. We made sure that once you have set your strap length, it locks in tight and the tag end of the strap stays tidy.

Are the Shoulder Carry Sheaths both left & right handed like your other sheaths?

Yes it is. All our sheaths are universally left and right handed and suit a factory Tramontina Bolo's handle. They will also suit one that we have shaped and sanded (including the Epoxy Handle Mod). We ask if you're Left or Right handed as we can set these up a little better to suit. We find these Shoulder Carry Sheaths suit a two handed cross draw with the sheath on the non-dominant side. For example, we carry these on the left for a right handed person. To keep the rig looking tidy, we position the height adjustment straps to sit behind as well as the Handle Retention Strap facing backwards.

By default, if you indicate that you're right handed, we will set these sheaths up to sit on the left hand side.


 Which shoulder do I carry this sheath on?

That is up to you. We find it very comfortable to carry with the strap across the chest, courier bag style. We use them with the sheath on the non-dominant side.

What is TEX400 Thread?

Now that is just the completely over done thread size that we use on these straps. TEX400 is the size but the full answer is that it is also a Bonded Polyester thread and a single strand is rated to 27kg. Every time you do a stitch, you're multiplying its strength... and you can double that because we use two threads under a lot of tension. Safety straps, Harnesses, military equipment, lifting straps etc would all use a similar thread. We use a two needle Saddle Stitch on the webbing. We use three stitching runs per side (That's six in total) to make up the angled straps and attachment point. It's tough, over done and it is not going to let go of it's hold any time soon!

Why is the seatbelt webbing strap one continuous length?

The main reason is to help reduce tangles in the straps when your pulling this rig on ( tangles are a pet peeve of ours!). The 50mm seatbelt webbing can have other important uses. The strap is one continuous length of seatbelt webbing that we fold back on itself and stitch in the angled straps. If you're in desperate need, you could carefully remove the shoulder strap and unpick the stitching. You will be left with a 2080mm long length of darn tough webbing. Provided the strap is in undamaged condition, the Working Load Limit on seatbelt webbing is incredibly high.

Additional information

What Size Sheath?

12" Latin, 14" Bolo, 18" Latin

Colour Options

Matt Black Epoxy, Coyote Tan, Olive Drab

Left or Right Handed

I am a Righty, I am Left Handed